Table of Contents
If you wish to download a version, you can do so here
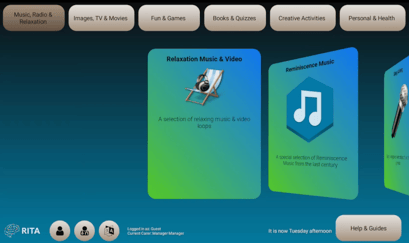
The RITA Home interface is configured to display different groups of apps for different types of therapy.
Along the top of the screen are 6 buttons that represent the topics or categories of application you can use.
The button categories are:
- Music, Radio & Relaxation
- Images, TV & Movies
- Fun & Games
- Books & Quizzes
- Apps & Creative Activities
- Personal & Health
Directly below the Category Buttons is a list of apps that will display what’s available in the selected Category.
At the bottom of the page on the Left-hand side you’ll find the RITA Logo and two Round Icon Buttons.
- RITA Logo
 (Tap and hold) – this will display information about the software and version.
 - User Login
 (Single Tap) – Single Tap to log-in, log-Out or create a new user account.
 - Bottom Right is the button to show you all the help and information documents for your version.
Create a New User Profile
Tap the Log-in button ![]() at the bottom of the screen.
at the bottom of the screen.
You will be given the option to Cancel Login, Create a ‘New Account’ or Login as an ‘Existing User’.
- To create a new user tap ‘New Account’.
- An important disclaimer will appear.
A permission request that must be agreed to before the account can be created. Read the disclaimer or read the disclaimer to the user and if agreed, tap ‘I Give Consent’ (If you do not give consent the account cannot be created!) - A new box will appear asking for the new Users, User Name. This must be a unique name or nickname Like BobB132 or DSmith or DSmith133 (No special characters or spaces). Tap ‘Continue’
- The system will check to ensure the ‘User Name’ is not already in use.
- The next box will request the users ‘First Name’. Enter the name or initial and tap ‘Continue’.
- The next box will request the users ‘Surname’. Enter the name or initial and tap ‘Continue’.
- The next box will request the users ‘Password’. Enter the password and tap ‘Continue’.
- Finally, the last box will request an Email address for recovery purposes. Enter the address and tap ‘Finish’.
- A new box will appear informing you it will take a few moments to create the new account files.
- You will be informed when the process has completed.
You are now immediately logged in and all work performed that saves data, will be saved to the user account.
The name will appear at the very bottom of the screen and will show ‘Logged In As:’
Users
User Login
Initially or when logged out, the default ‘Guest’ account will be in use, not all activities will operate when logged in as the Guest.
To Log-in tap the user button ![]() at the bottom of the screen.
at the bottom of the screen.
You will be given the option to Cancel Login, Create a New Account or Login as an Existing User.
- To login tap Existing User
- A list will appear of all the users registered on the device.
- Tap the Name of the user.
- A new box will appear asking for the Users Password enter the password and tap Continue.
If you enter the wrong password a message will display informing you to try again. (Passwords are Case Sensitive).
You are now logged in and all work performed that saved data will be saved to the user account.
The name will appear at the very bottom of the screen and will show ‘Logged In As:’
User Logout
To logout Tap the user button at the bottom of the screen again.
You will be given the option to ‘Cancel’ logout or ‘Log Out’ of your Session.
- To Logout tap ‘Log Out’
You are now logged out and all databases and work files will be closed.
At the very bottom of the screen the name will now show ‘Logged In As: Guest’ this is displayed directly above the ‘Current Carer’
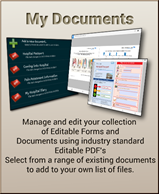
Forms and Documents.
A new feature is the ability to include Editable PDF data forms and save specific forms to each user.
Each of the DARTs versions can have different documents for different needs.
For example:
LDV & Children’s versions can have ‘All About Me’ documents that detail music, hobbies, friends, hangouts and other items important to them.
Reminiscence may have documents on Delirium and Dementia
- Tap the Lifestory & Personal Projects category button

 Scroll the cover flow to locate the My Documents Tile.
- All forms saved to the current user will be shown with the PDF icon At the top of the list is the Add Document option
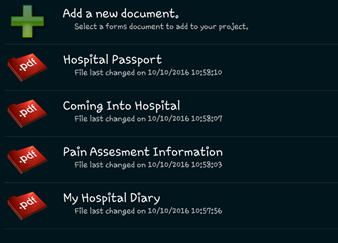
You can select any of the saved PDF’s and when asked what app to open with, select ‘Adobe Reader’ from the list (other PDF readers may not have the ability to edit documents)
The adobe application will save changes to your document, when you exit the PDF. Use the device/tablet ‘Back’ button (Not the Home button)
Adding a document
- Tap the
 Add Document entry in the list.
 - All available documents for the DART version will be displayed in a scroll view and you can scroll left or right.
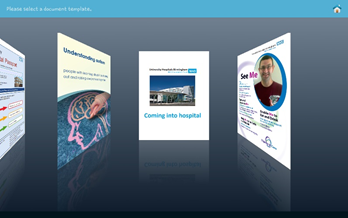
- Tap on a Document and a pop-up will appear giving you some information on the document.
- Tap ‘Yes’ to include the document in your list of documents.
- Tap the Home button in the top Right corner to return to your list of documents.
You cannot save multiple copies of the same document to your list of documents, if you want to create a new document that you have previously included you must delete the original from your list.
Delete a Document
You can delete a document by tapping and HOLDING the document entry in the list, a pop-up will appear asking if you want to delete the selected document.
System Information
When required, information about the installed RITA Home Interface can be viewed by tapping and holding the ![]() Icon in the lower left of the screen. Information displayed will be:
Icon in the lower left of the screen. Information displayed will be:
- Version Number and Software Build.
- Trust Name & Location
- Device Name & ID
Other Settings
Most other settings are for Management or Engineer use and require a password to access.
Management & Engineer
- File Manager
- Wi-Fi Settings
- User Management
Engineer Only
- Google Play
- Android Device Settings
- Device Initial Setup.
‘Cloud Services Test Utility’ App, ‘Team Viewer Support’ and ‘Device Skin Chooser’ do not require a password.